This is a simple first project for anyone new to Arduino. You will make a small light (called an LED) turn on and off by itself.
What You Need:
- An Arduino Uno board
- One LED (any color)
- One resistor (470Ω)
- A breadboard
- Jumper wires
- A USB cable to connect the Arduino to your computer
What is an LED?
An LED is a special kind of light bulb. The name stands for Light Emitting Diode. An LED has two legs (called “leads”) that are different lengths.
- The Short Leg (-): This is the negative side (called the cathode). This leg must connect to the ground (GND).
- The Long Leg (+): This is the positive side (called the anode). This leg must connect to the power source.
What is a Resistor?
A resistor is a small part that slows down electricity.
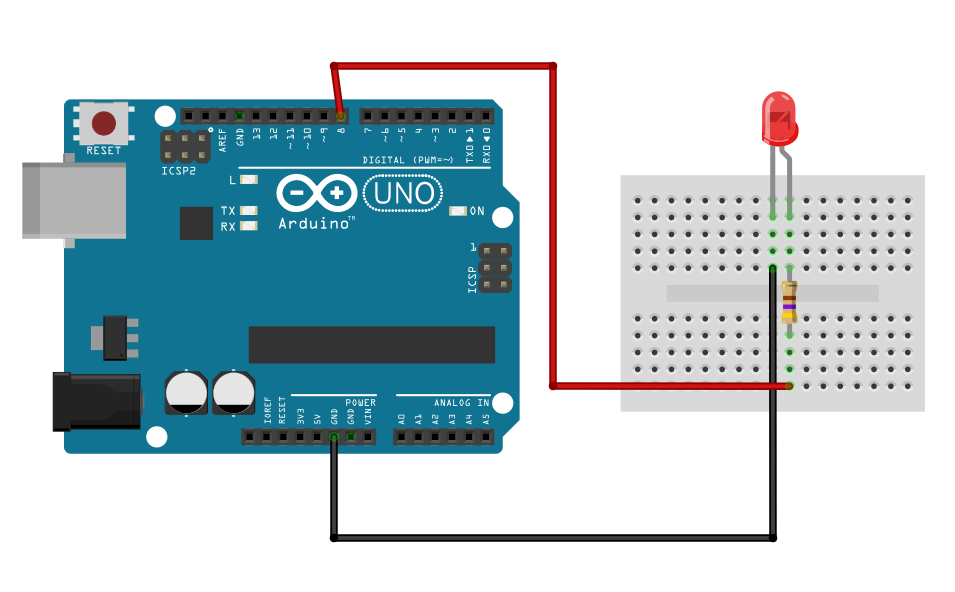
Circuit diagram
Here’s how to connect the wires:
| LED | Arduino | |
| Anode (+) |
|
Pin 8 |
| Cathode (-) |
|
GND |
Look at the picture to see how to connect the LED to your Arduino Uno:

- Place the LED on the breadboard.
- Connect a 470Ω resistor to the long leg of the LED.
- Use a jumper wire to connect the other side of the resistor to digital pin 8.
- Connect the short leg of the LED directly to GND on the Arduino.
Arduino Example Code
Let’s now write the code for the Arduino sketch. Launch the Arduino IDE and enter:
void setup() {
  pinMode(8, OUTPUT);
}

void loop() {
  digitalWrite(8, HIGH); // turn LED on
  delay(1000);            // wait 1 second
  digitalWrite(8, LOW);  // turn LED off
  delay(1000);            // wait 1 second
}
The LED should begin blinking after uploading, repeatedly turning on for one second and off for another.

